

How to Use Hugging Face Models With ComfyUI: Beginner Workflow
By Arsalan Bilal — AI tools researcher and digital publisher at AiGetPro.
Last verified: October 2026
Quick answer: To use Hugging Face models with ComfyUI, find a compatible model repository, check its architecture and licence, download the required weight files, and place them in the correct ComfyUI model folders. Load a matching workflow, select the appropriate model loader, and run the workflow to generate your first image.
Hugging Face is full of interesting AI models, but getting one to work in ComfyUI isn’t always as simple as downloading a file.
You might find a .safetensors file, download it, and move it into your ComfyUI folder, only to discover that the model doesn’t appear. Sometimes the file is in the wrong directory. Other times, it’s a LoRA, a VAE, or only one component of a larger model.
The important thing is to understand what you’ve downloaded before trying to load it.
In this guide, we’ll go through the complete process: finding a compatible model, checking its files, downloading it from Hugging Face, installing it correctly, and generating your first image with ComfyUI.
What Are Hugging Face Models and How Do They Work With ComfyUI?
Hugging Face is a platform where developers and AI researchers share machine-learning models, datasets, and related resources. Its repositories cover image generation, language processing, audio, computer vision, and other AI tasks.
ComfyUI is an open-source, node-based interface for creating and running generative AI workflows. Instead of hiding the entire process behind one Generate button, it lets you connect individual operations and control how a model produces an output. GitHub+1
Think of Hugging Face as the place where you find the model. ComfyUI is where you load it into a workflow and generate the image.
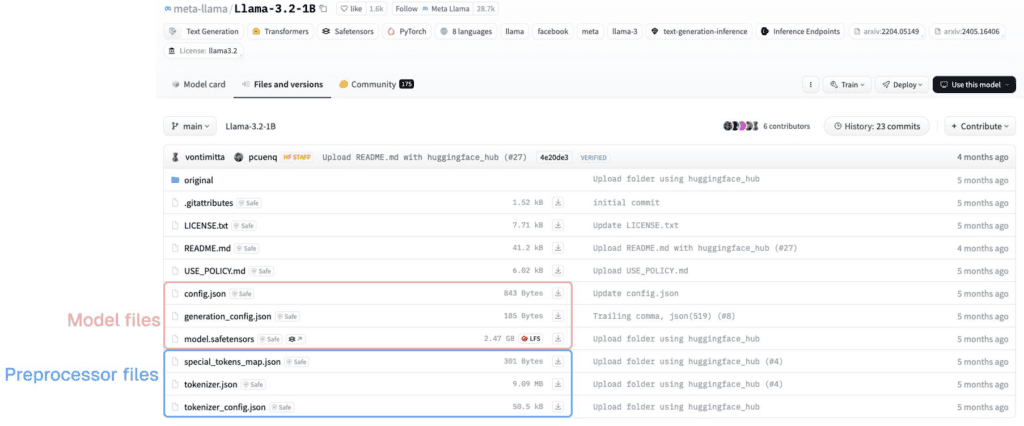
Hugging Face repository interface. The Files tab is where you inspect downloadable model files.
What Can You Download From Hugging Face?
For ComfyUI image-generation workflows, you’ll commonly encounter these resources:
- Checkpoints: Main model weights used by compatible image-generation workflows.
- LoRA models: Additional weights that modify a compatible base model’s style, subject, or behaviour.
- VAEs: Components used to encode or decode image representations.
- Text encoders: Components that process text prompts for particular model architectures.
- Diffusion models: Model components responsible for the image-generation process.
- ControlNet models: Additional models that guide generation using information such as edges, depth, or pose.
- Workflow files: Instructions describing how ComfyUI nodes are connected.
You won’t need every component for every model.
A basic Stable Diffusion checkpoint may work as a single-file model, while some FLUX workflows require separate diffusion, text-encoder, and VAE files.
Why Do Some Hugging Face Models Work in ComfyUI While Others Don’t?
The main reason is model compatibility.
ComfyUI supports different architectures, but not every Hugging Face repository can be loaded directly through the standard Load Checkpoint node.
There are two important formats to understand.
Single-file checkpoint: The model’s main weights are stored together in one file, commonly using .safetensors or .ckpt.
Diffusers format: Model components are stored in separate directories, such as unet, text_encoder, vae, and scheduler.
Safetensors describes how weights are stored, not which architecture they belong to. A Safetensors file can contain a checkpoint, LoRA, VAE, or another model component. Hugging Face+1
ComfyUI’s official documentation also explains that some models need community custom nodes rather than built-in loaders. ComfyUI
That’s why checking the model documentation before downloading is important.
What You Need Before Using Hugging Face Models in ComfyUI
Before downloading a large model, make sure your installation and computer are ready.
Install and Open ComfyUI
You need a working ComfyUI installation first.
For most Windows beginners, ComfyUI Desktop is a straightforward starting point. Portable is another option if you prefer managing files and folders yourself.
We’ve already covered the process in our complete ComfyUI installation guide for Windows.
Once ComfyUI opens successfully, move on to model installation.
Create a Hugging Face Account
Not every model requires an account. Many public repositories allow direct downloads.
However, some models are gated. These require you to log in and may ask you to accept usage conditions or request access from the model author.
Hugging Face supports automatic and manual approval for gated model access. A manual request can remain pending until the model author approves it. Hugging Face
Check GPU, VRAM, and Available Storage
A successful download doesn’t guarantee successful generation. The model may exceed your available GPU memory once the workflow starts.
Before choosing a model, check:
- Your GPU model and available VRAM.
- Available system RAM.
- Free disk space.
- The model’s recommended hardware.
- Required supporting files.
- Expected image resolution and workflow complexity.
There isn’t one universal VRAM requirement for ComfyUI. A smaller Stable Diffusion checkpoint and a large multi-component model can have very different requirements.
Understand the Most Common Model File Types
| File or format | What it represents | Important consideration |
|---|---|---|
.safetensors | Serialized model weights | Identify which model component it contains |
.ckpt | Checkpoint weights | Verify its origin and compatibility |
.json | Configuration or metadata | Usually not a standalone model |
LoRA .safetensors | Additional model weights | Requires a compatible base model |
| VAE weights | Encoding/decoding component | Requires a suitable loader |
.gguf | Quantized model weights | May need a community extension |
Beginner tip: Never select a model just because its filename ends in .safetensors. Read its model card first.
How to Find the Right ComfyUI-Compatible Model on Hugging Face
This is where a little checking can prevent unnecessary downloads.
Search Hugging Face for Image-Generation Models
Open the Hugging Face Models page and search for the model you want to use.
For this tutorial, we’re looking for a Stable Diffusion image-generation checkpoint.
When browsing results, check whether the model is intended for image generation rather than text generation, audio processing, or another task.
Also look for the comfyui tag or explicit installation instructions from the model author. A tag helps, but it doesn’t replace checking the actual workflow requirements.
Read the Model Card Before Downloading
A model card explains what the model does and how it should be used.
Check these five things:
- Architecture: Is it SD 1.5, SDXL, FLUX, or another architecture?
- Intended use: Is it designed for text-to-image or image editing?
- Requirements: Does it need separate text encoders, VAEs, or other components?
- Workflow: Does the author provide a ComfyUI example?
- Licence: What restrictions apply to using the model?
Hugging Face model cards can contain task information, descriptions, evaluation details, and licence metadata. Review the linked licence rather than assuming every downloadable model is commercially unrestricted. Hugging Face+1
Open Files and Versions to Identify the Correct Download
After selecting a model, open its Files and Versions tab.
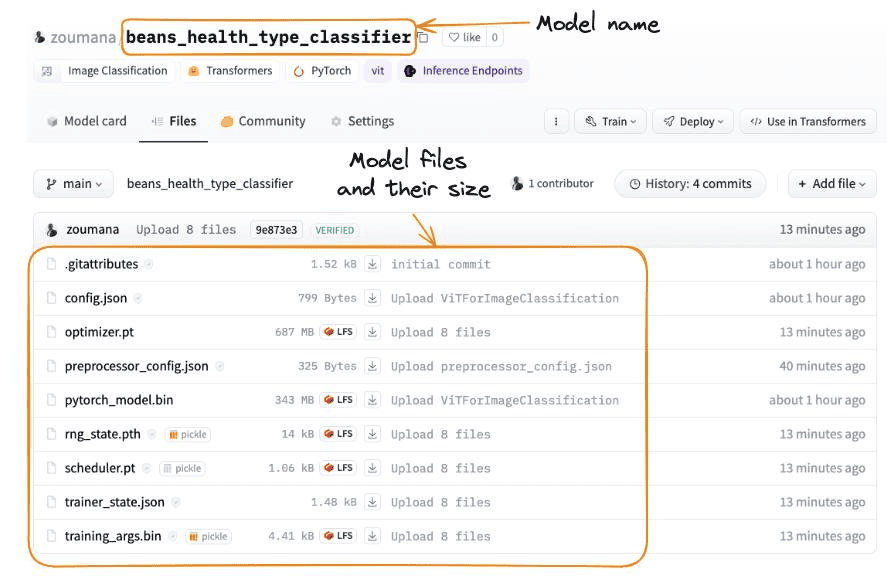
Look for the main weights and any required supporting components.
You might find:
model.safetensorsconfig.jsonmodel_index.jsondiffusion_pytorch_model.safetensorstext_encodervae
Download only the files specified by the model card or compatible workflow. Some repositories contain multiple precision variants and unrelated training files.
Check Whether the Model Includes a ComfyUI Workflow
A matching workflow makes installation easier because it identifies the required nodes and model components.
Look in the model’s README, associated project page, or example collection.
A useful workflow should help you identify:
- The expected model architecture.
- Required loader nodes.
- Supporting models and components.
- How the nodes connect.
This matters particularly when working with models that need several separate files.
How to Download Hugging Face Models for ComfyUI
There are two practical download methods. Beginners can use the website, while users who regularly download models may prefer the CLI.
Method 1 — Download a Model Directly From the Hugging Face Website
Follow these steps:
- Open the selected Hugging Face repository.
- Read the model card and compatibility instructions.
- Select Files and Versions.
- Find the required weight file.
- Check its filename and file size.
- Select Download.
- Wait for the download to finish.
For example, if your selected workflow requires a Stable Diffusion checkpoint, download that checkpoint rather than a LoRA or unrelated configuration file.
Keep the original filename. Some workflows refer to specific model filenames, and renaming them can create unnecessary confusion.
Method 2 — Download Models Using the Hugging Face CLI
The Hugging Face CLI is useful when you want to download specific files into a particular directory.
The current CLI is called hf. On Windows, Hugging Face provides a standalone installer through PowerShell:
powershell -ExecutionPolicy ByPass -c "irm https://hf.co/cli/install.ps1 | iex"Alternatively, if Python is already installed, use:
pip install -U "huggingface_hub"After installation, open a new terminal window and use:
hf download OWNER/MODEL_REPOSITORY model.safetensors --local-dir "D:\AI-Models"Replace:
OWNER/MODEL_REPOSITORYwith the actual repository ID.model.safetensorswith the exact filename.D:\AI-Modelswith your preferred destination.
For our tutorial example, use:
hf download Comfy-Org/stable-diffusion-1.5 v1-5-pruned-emaonly-fp16.safetensors --local-dir "D:\AI-Models"The current Hugging Face CLI supports individual-file downloads, custom destinations, and repository downloads. Hugging Face+1
For your first model, downloading through the website is perfectly fine. The CLI becomes more useful when you regularly download models or want to automate file management.
How to Download Gated Models From Hugging Face
If a repository is gated, sign in and follow its access instructions in your browser.
After access is granted, CLI users can authenticate using:
hf auth loginFollow the terminal instructions to sign in.
Never publish your Hugging Face access token in screenshots, public code, or shared workflow files. It’s connected to your account and should remain private. Hugging Face+1
Where to Put Hugging Face Models in ComfyUI
After downloading, ComfyUI still needs the files in the correct directory and a compatible loader.
Correct ComfyUI Model Folder Locations
The following are commonly used model folders. Exact paths can vary depending on the architecture, ComfyUI version, and custom-node implementation.
| Model type | Common ComfyUI directory |
|---|---|
| Checkpoints | models/checkpoints/ |
| LoRAs | models/loras/ |
| VAEs | models/vae/ |
| Diffusion models | models/diffusion_models/ |
| Legacy diffusion models | models/unet/ |
| CLIP/text encoders in legacy configurations | models/clip/ |
| CLIP Vision | models/clip_vision/ |
| ControlNet | models/controlnet/ |
| Upscalers | models/upscale_models/ |
ComfyUI’s official additional-model-path configuration documents these directory names and explains how to configure external storage. Follow the specific model instructions when a newer workflow uses a dedicated text-encoder location. ComfyUI
How to Locate Your ComfyUI Models Folder
The location depends on your installation.
For ComfyUI Desktop:
- Open ComfyUI Desktop.
- Open the capsule menu at the top of the application.
- Select the Storage tab.
- Find your configured model directories.
- Open the appropriate directory.
For ComfyUI Portable:
Open the extracted installation directory and navigate to:
ComfyUI_windows_portable/
    ComfyUI/
        models/
            checkpoints/
            loras/
            vae/
            diffusion_models/
            unet/
            clip/
            controlnet/
Some directories may need to be created if they aren’t already present.
What to Do With Diffusers-Format Model Repositories
A Diffusers repository may contain a structure similar to this:
model/
│
├── model_index.json
│
├── unet/
│   └── model files
│
├── text_encoder/
│   └── model files
│
├── vae/
│   └── model files
│
└── scheduler/
    └── configuration files
This is different from a single-file checkpoint.
A standard Load Checkpoint node expects a compatible checkpoint file. It won’t automatically turn an entire Diffusers repository into a working ComfyUI workflow.
Before downloading a Diffusers repository, look for ComfyUI-specific installation instructions or an example workflow. Hugging Face+1
How to Load a Hugging Face Model Into ComfyUI
Now that your files are in the right locations, open ComfyUI and connect the model to a suitable workflow.
Refresh ComfyUI After Adding Model Files
If ComfyUI was already running when you copied the files, the model might not immediately appear.
Try these steps:
- Return to the ComfyUI interface.
- Press
Rto refresh node definitions and model detection. - Open the appropriate loader node.
- Check whether your downloaded model appears.
- Restart ComfyUI if it is still missing.
The current official model documentation recommends checking the folder, refreshing, and restarting where necessary. ComfyUI
Choose the Correct Model Loader Node
Different model components need different loaders.
| Loader node | Purpose |
|---|---|
| Load Checkpoint | Loads a compatible complete checkpoint |
| Load LoRA | Loads a compatible LoRA adapter |
| Load VAE | Loads a separate VAE |
| Load Diffusion Model | Loads supported diffusion components |
| Text encoder loader | Loads supported text-encoding components |
For a basic Stable Diffusion checkpoint, start with Load Checkpoint.
For newer architectures, use the loader specified by the matching workflow.
Select the Model and Check for Missing Components
Once the correct loader is available, select your downloaded file.
Check that:
- The model name appears in the dropdown.
- The workflow uses the same architecture.
- Required supporting files are present.
- No missing-node or missing-model warnings remain.
Run the workflow to confirm that the complete setup works. A filename appearing in a selector doesn’t prove that every required component is available.
Build Your First ComfyUI Workflow Using a Hugging Face Model
Let’s use a documented Stable Diffusion 1.5 checkpoint as a beginner example.
The official Comfy-Org repository contains:
v1-5-pruned-emaonly-fp16.safetensors
You can find it in the Comfy-Org Stable Diffusion 1.5 repository.
This is a useful example for learning single-file checkpoint installation. It’s an older model, not a recommendation that it is the latest or best option for every image-generation task. Comfy-Org/stable-diffusion-1.5 at main+1
Load a Compatible Text-to-Image Workflow
ComfyUI provides an official text-to-image workflow tutorial.
Its example workflow image can be downloaded and dragged into the ComfyUI interface to load the graph. It contains workflow metadata, so this is more useful than an ordinary screenshot.
Official ComfyUI example image. See the text-to-image tutorial for instructions on loading the workflow. ComfyUI
A classic checkpoint-based text-to-image workflow contains these components:
- Load Checkpoint: Selects the Stable Diffusion model.
- CLIP Text Encode: Converts your prompt into conditioning information.
- Empty Latent Image: Defines the image dimensions and batch size.
- KSampler: Performs the sampling process.
- VAE Decode: Converts the latent representation into an image.
- Save Image: Saves the finished result.
You don’t need to understand every setting yet. The important part is selecting the correct model and connecting compatible components.
Enter a Prompt and Generate an Image
For your first test, use a straightforward prompt:
A small wooden cabin beside a peaceful lake at sunrise, soft golden light, realistic landscape photography, natural colours, detailed environment.
Enter it into the positive prompt field.
Keep the workflow’s default settings for your first attempt. Once generation works, experiment with sampler settings, image dimensions, and other controls.
Now click Queue Prompt.
ComfyUI will process the workflow, and the resulting image should appear in the output preview.
Where to Find and Save Your Generated Image
Many standard ComfyUI installations save generated images inside the output directory.
The exact location can differ in Desktop-managed installations, so check your storage settings if you can’t find the result.
Also save the working workflow so you can reuse it later.
Save the Workflow for Future Use
Export or save your workflow in JSON format using ComfyUI’s workflow options.
Keep a record of:
- The Hugging Face repository.
- The exact model filename.
- Any LoRAs or supporting files.
- The workflow JSON.
- Important generation settings.
This makes it easier to reproduce the same output without guessing which files you previously downloaded.
Once you have a reusable workflow, think about how the output will actually be used. A landscape test image is useful for learning ComfyUI, but consistent product visuals, social-media graphics, and campaign assets need a clearer brief. If that is your goal, our guide explains how to use AI-generated images in marketing without turning every project into an endless model-downloading exercise.
Common Problems When Using Hugging Face Models With ComfyUI
If something doesn’t work, don’t immediately reinstall ComfyUI. Check the actual error first.
| Problem | Likely cause | First thing to check |
|---|---|---|
| Model doesn’t appear | Incorrect folder | Check directory and refresh |
| Missing model error | Workflow expects another file | Check required filename |
| Safetensors won’t load | Wrong component or architecture | Verify the loader |
| Access denied | Gated repository | Check Hugging Face permissions |
| Download incomplete | Interrupted download | Verify file size |
| GGUF not recognized | Missing compatible loader | Check extension requirements |
| Out-of-memory error | Insufficient available resources | Reduce workload |
Why Is My Hugging Face Model Not Showing in ComfyUI?
First, check its location.
A checkpoint stored in models/loras won’t appear in the standard checkpoint loader. Similarly, a LoRA stored in models/checkpoints doesn’t become a complete checkpoint.
Check these things:
- Confirm the download completed.
- Verify the model directory.
- Press
Ror restart ComfyUI. - Check the architecture and file type.
- Confirm the active installation uses the directory you modified.
Why Does ComfyUI Say the Model Is Missing?
This usually happens when a workflow references a model that isn’t installed.
For example, an imported workflow designed for SDXL may reference a file you haven’t downloaded.
Read the missing-model warning and identify the exact required filename. Don’t substitute a different checkpoint simply because both files end in .safetensors.
Why Does a Safetensors Model Fail to Load?
The extension alone doesn’t identify the model type.
A .safetensors file can contain a checkpoint, LoRA, VAE, or another component. Check its model card and make sure your workflow uses the correct loader.
What If a GGUF Model Does Not Work?
ComfyUI’s documentation states that GGUF models are not natively supported by its standard installation. Compatible community extensions, such as ComfyUI-GGUF, may be required. ComfyUI
Before installing an extension, check its README, supported architecture, dependencies, and compatibility with your ComfyUI version.
How to Fix Hugging Face Download and Access Errors
Try these checks:
- Confirm that the repository is public or your access request was approved.
- Check available disk space.
- Retry the download if the connection was interrupted.
- Verify the file’s listed size.
- Authenticate if the repository requires it.
- Check whether your network or security software blocks the download.
Use the official ComfyUI documentation and Hugging Face CLI guide for more involved problems.
Best Practices for Using Hugging Face Models With ComfyUI
Once you have a working model, a few simple habits will make future installations easier.
Always Check the Model Licence
A freely downloadable model isn’t automatically available for unrestricted commercial use.
Check the model card, linked licence, and additional usage conditions before using generated images in client projects, products, or advertising.
Some model licences have restrictions that differ from the licences covering ComfyUI itself or its extensions.
Download Only the Files Your Workflow Needs
Repositories may contain several model variants and supporting components.
Downloading everything can consume unnecessary storage. Start with the exact files identified by the author or workflow.
Keep Models and Workflows Organized
Keep compatible files in their designated directories and save copies of your working workflows.
If you use multiple ComfyUI installations, you can configure additional model paths through extra_model_paths.yaml. Desktop users can also manage model directories through the Storage tab. ComfyUI+1
For more open-source software tutorials, explore AiGetPro’s Free AI Tools & GitHub Guides.
You can also read our guide to the best open-source AI tools on GitHub for beginners.
Install Custom Nodes Only When Required
Custom nodes can support additional model architectures and workflow features, but they also introduce dependencies.
Start with ComfyUI’s built-in loaders. Install an extension only when the model or workflow documentation requires it.
Frequently Asked Questions
Can I use a Hugging Face model without downloading it?
Usually not for local ComfyUI generation. The workflow defines the nodes and settings, but the required model weights must be available locally or through a supported remote service.
What is the easiest Hugging Face model to use with ComfyUI?
A Stable Diffusion 1.5 checkpoint with a documented ComfyUI workflow is a straightforward beginner example. It is useful for learning single-file checkpoint installation, although it is an older model.
Can I keep ComfyUI models on an external drive?
Yes. ComfyUI supports additional model paths in supported installations. Configure the path correctly and ensure the drive is connected whenever you generate images.
What is a VAE in ComfyUI?
A VAE encodes and decodes image representations in supported workflows. Some checkpoints include a VAE, while others require a separate VAE file.
What is a text encoder in ComfyUI?
A text encoder converts prompts into conditioning information used by an image-generation model. Some architectures require separate text-encoder files.
Should I download FP16 or FP8 models?
Choose the version recommended by the model author and supported by your hardware and workflow. Reduced-precision files may reduce memory requirements, but compatibility and output characteristics can differ.
How do I avoid downloading the wrong Hugging Face model?
Read the model card, confirm the architecture, inspect the required files, and look for a compatible ComfyUI workflow before downloading.
Can I share a ComfyUI workflow with someone else?
Yes. Export it as JSON and share the model repository, exact filenames, supporting components, and important settings so another user can reproduce the workflow.
Start With One Compatible Hugging Face Model
You don’t need to download ten models or install a collection of custom nodes to start using Hugging Face with ComfyUI.
Begin with one model that has clear ComfyUI instructions. Check its architecture, download the required files, put them in the correct directories, and load a matching workflow.
For your first test, the Comfy-Org Stable Diffusion 1.5 checkpoint is a practical example because ComfyUI’s official tutorial references it.
Once you’ve generated an image successfully, you can explore LoRAs, SDXL, FLUX, custom workflows, and more advanced configurations.
Image generation is only one part of a creative AI workflow. If your end goal is short-form video, ads, or social content, you will eventually need to move generated visuals into an editor. Our comparison can help you compare AI video editing tools before you commit to a particular editing workflow.
The useful skill isn’t downloading as many models as possible. It’s understanding what each model needs and getting it to work reliably.

Arsalan is an independent AI tools researcher and
digital publisher. He tests free and paid AI tools,
tracks the remote AI job market, and writes practical
guides for professionals who want to work smarter
with AI.
Now focused on
AiGetPro — a resource for honest AI tool comparisons,
remote AI job guides, and free GitHub tool discoveries.