

How to Install ComfyUI on Windows: Complete Beginner Guide
By Arsalan Bilal, AI tools researcher and digital publisher at AiGetPro Last verified: October 2026
Quick answer: To install ComfyUI on Windows, download the official ComfyUI Desktop installer from Comfy.org, run it, choose a local installation, and complete the setup wizard. Then add a compatible AI model, load a basic text-to-image workflow, and click Queue Prompt to generate your first image. Choose the Portable version if you prefer a self-contained folder and manual control.
One tutorial tells you to install Python, another mentions CUDA, and a third has you downloading several gigabytes of model files, so it is easy to see why ComfyUI looks intimidating. For a first install, you can skip most of that and use ComfyUI Desktop. If you prefer to manage the installation yourself, the Portable version is another option.
This guide covers Desktop and Portable installs, your first model, and the errors beginners hit most often.
ComfyUI Windows Requirements: Quick Answer
ComfyUI Desktop supports Windows 10 or later on x64 and ARM64 systems. It recommends at least 4.85 GB of disk space per installation, 8 GB of RAM, and 16 GB of RAM for better performance. A dedicated GPU is recommended for faster image generation, but ComfyUI can also run on CPU.
What Is ComfyUI, and What Can You Do With It?
ComfyUI is an open-source, node-based interface for building generative AI workflows. You connect operations, such as loading a model, entering a prompt, generating an image, and saving the result, to control how an AI task runs. You can use it for text-to-image generation, image editing, upscaling, and other supported workflows.
ComfyUI is especially useful when you want more control over the generation process than a simple image generator provides. If your broader goal is to turn generated visuals into short-form video, ads, or social content, it can help to compare AI video editing tools before building a full production workflow.
How ComfyUI Differs From a Basic AI Image Generator
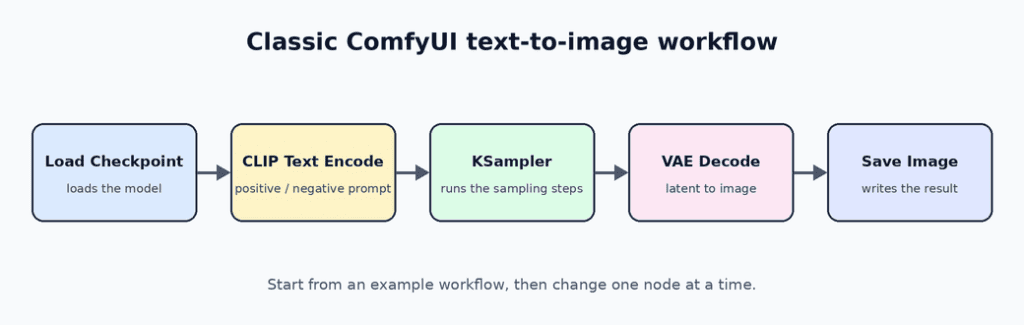
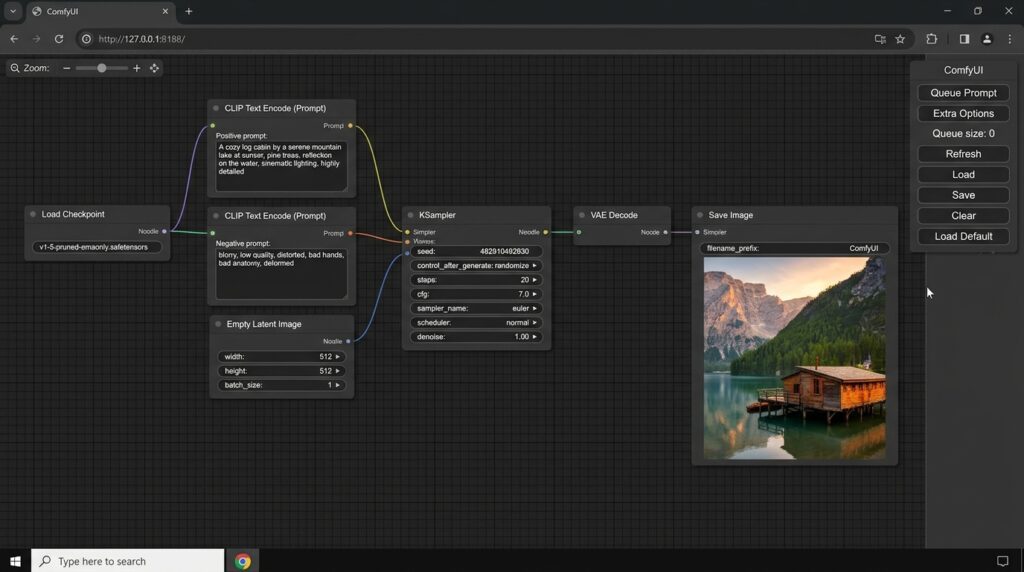
A simple image generator usually asks you to enter a prompt and click Generate. ComfyUI lets you see and change each step (model loading, prompting, sampling, and saving) rather than hiding them behind one button. A classic text-to-image workflow may include:
- Checkpoint loader: Loads a compatible AI model.
- Text encoders: Process your positive and, where applicable, negative prompts.
- Sampler: Performs the image-generation process.
- VAE decoder: Converts latent output into an image.
- Save Image: Saves the finished result.
Show Image <!– OPTIONAL REAL SCREENSHOT: your own screenshot of the ComfyUI canvas with the default workflow loaded. Filename: comfyui-default-workflow-canvas.png. Alt: “ComfyUI default text-to-image workflow open in the browser interface”. –>
Start from a compatible example workflow, then change one node at a time.
Is ComfyUI Free to Install and Use Locally?
Yes. The core ComfyUI software is open source under the GPL-3.0 license, and you can install it locally without purchasing a paid license for the application itself.
ComfyUI itself is free, but model files, storage, VRAM, and optional cloud services can still cost money or require a capable PC. Some model files also have their own license conditions. See the official ComfyUI website for the software and current installation options.
Check Your Windows PC Before Installing ComfyUI
Before downloading anything, check your operating system, graphics hardware, memory, and available storage. These determine which installation method and AI model will work best.
Which Windows Versions Does ComfyUI Support?
The current ComfyUI Desktop documentation lists Windows 10 or later, supporting x64 and ARM64 architectures. A dedicated GPU is recommended for good performance, but isn’t an absolute requirement for running the application.
To check your system:
- Press Windows + I to open Settings.
- Select System → About.
- Find your Windows edition, system type, and installed RAM.
- Open Task Manager and select Performance → GPU to identify your graphics hardware.
Do You Need an NVIDIA, AMD, or Intel GPU?
A dedicated GPU is highly recommended if you plan to generate images locally at reasonable speeds. The official Portable documentation includes CPU and NVIDIA launch options, while AMD and Intel support may require separate packages or installation methods. Don’t download an NVIDIA-specific package simply because an older tutorial uses it.
| Hardware | What to do |
|---|---|
| NVIDIA GPU | Choose the appropriate NVIDIA package for your hardware |
| AMD GPU | Follow the current official AMD Windows instructions |
| Intel GPU | Follow the current official instructions for Intel hardware |
| CPU only | Use a CPU-compatible installation, expecting slower generation |
Check the official Portable Windows guide before selecting a package.
How Much RAM, VRAM, and Storage Should You Have?
ComfyUI Desktop’s documentation recommends at least 4.85 GB of disk space per installation and lists 8 GB of RAM, with 16 GB recommended. The installation itself isn’t the whole story: model downloads and generated images require additional space.
There is no single VRAM minimum that guarantees every workflow will run. A workflow that runs on 8 GB of VRAM may fail on a 4 GB GPU if it uses a larger model, higher resolution, or a bigger batch size.
Use this checklist before continuing:
- Identify your GPU and available VRAM.
- Make sure your graphics drivers are up to date.
- Reserve enough disk space for the software and models.
- Decide whether you want Desktop or Portable.
- Check the requirements of the model you intend to use.
Official reference: ComfyUI system requirements.
ComfyUI Desktop vs Portable: Which Installation Method Is Best?
Both methods can run ComfyUI locally, but they serve slightly different needs.
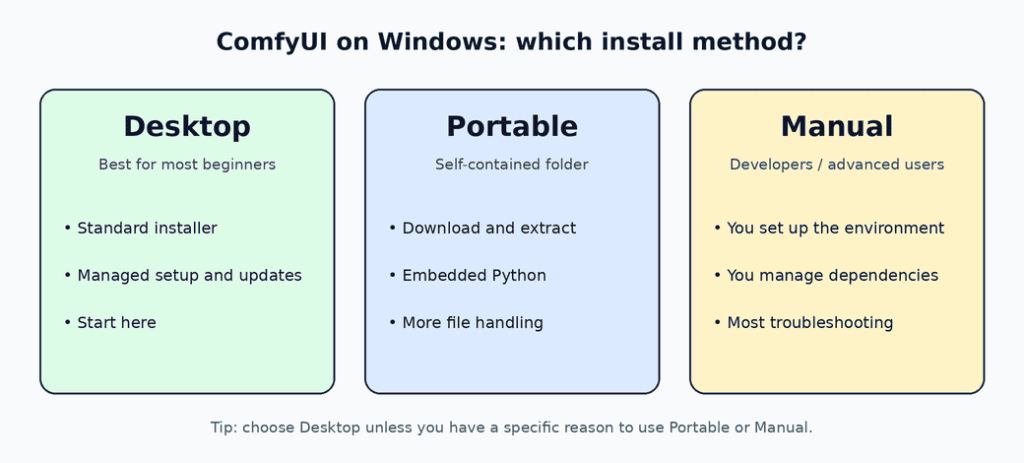
| Feature | Desktop | Portable | Manual |
|---|---|---|---|
| Beginner-friendly setup | Best starting point | Requires more file handling | Most technical |
| Python setup | Managed by the application | Includes an embedded environment | You manage dependencies |
| Installation style | Desktop installer | Download and extract an archive | Set up the environment yourself |
| Best for | Most new users | Users wanting a self-contained folder | Developers and advanced users |
Choose ComfyUI Desktop for the Simplest Setup
ComfyUI Desktop manages installation and launches your ComfyUI instances from a desktop application. It also provides an update interface. Desktop handles most Python and dependency setup, which is why it is the easier first option.
Choose ComfyUI Portable for a Self-Contained Folder
Portable includes its own embedded Python environment, so you don’t need to install a separate system-wide Python just to run that package. It is useful if you want everything in one folder you can move, back up, or manage manually. The supported package still matters, so follow the official instructions.
When Should You Use Manual Installation?
Manual installation gives advanced users more control over Python, dependencies, and development versions. It also requires more troubleshooting knowledge.
My recommendation: Start with Desktop unless you have a specific reason to use Portable or Manual. You can explore advanced configuration after you have a working installation.
How to Install ComfyUI on Windows Using Desktop
This is the recommended method for most beginners.
Step 1: Download the Official Windows Installer
Go to the official ComfyUI download page and select the Windows Desktop download. Download the installer only from the official ComfyUI website or its linked official repository. Avoid unofficial repackaged installers. <!– YOUR OWN SCREENSHOT: the Comfy.org download page with the Windows button visible. Filename: comfyui-download-page-windows.png. Alt: “ComfyUI official download page with the Windows Desktop installer button”. –>
Step 2: Run the Installer
Open the downloaded .exe file and follow the installation prompts. Install it in a normal user folder with enough free space, such as D:\ComfyUI or C:\Users\YourName\ComfyUI. Once installation finishes, launch Comfy Desktop from the Start menu or desktop shortcut.
Step 3: Choose a Local Installation
On first launch, Desktop asks how you want to run ComfyUI. Select the option to install and run it locally on your own computer, not a cloud instance. Follow the setup wizard to choose the installation location and available configuration options. If your GPU is detected, verify that the selected hardware matches your computer. <!– YOUR OWN SCREENSHOT: the installer GPU / local-install selection screen. Filename: comfyui-desktop-gpu-selection-screen.png. Alt: “ComfyUI Desktop first-launch screen for choosing a local installation and GPU”. Installer screens change between versions, so use your own capture. –>
Step 4: Finish Setup and Open ComfyUI
Allow the application to finish configuring its local installation. Depending on the version and selected setup, some components or model files may need to be downloaded. When setup is complete, open the local ComfyUI instance and check that the interface loads without an error.
Do not install custom nodes yet. First confirm that the default workflow runs.
Step 5: Check for Updates
Comfy Desktop includes an update interface. Use its built-in update controls rather than following an old tutorial’s commands without checking whether they apply to your installation. Export your workflows and copy your model paths before a major update.
How to Install ComfyUI Portable on Windows
Use this method if you prefer a self-contained folder or need one of the supported Portable packages.
Step 1: Download the Correct Portable Package
Open the official ComfyUI Portable Windows guide. Choose the package that matches your hardware. The current documentation covers CPU and NVIDIA launch options, and package variants and requirements can change, so confirm on the current download page.
Step 2: Extract the Archive
After downloading, extract the archive into a suitable folder using an archive utility such as 7-Zip. The extracted folder contains the ComfyUI application, an embedded Python environment, update scripts, and launch files.
Step 3: Start ComfyUI With the Correct Launch File
For the standard NVIDIA Portable package, the launch file is run_nvidia_gpu.bat. CPU-only mode is also available through run_cpu.bat. Double-click the appropriate file. A terminal window should appear while ComfyUI starts.
Step 4: Open the Local Web Interface
When the server starts successfully, it normally directs you to http://127.0.0.1:8188. If the browser doesn’t open automatically, enter that address manually. Keep the terminal window open while using Portable. Closing it stops the running ComfyUI process.
How to Download and Add Your First AI Model
ComfyUI is the workflow tool; the image model is usually a separate download. You must have a model compatible with your chosen workflow.
Understand Checkpoints, LoRAs, and VAEs
- Checkpoint: A checkpoint is a model file used by a compatible generation workflow.
- LoRA: An additional set of model weights that modifies a compatible model’s behavior or style.
- VAE: A component used to encode or decode image representations in supported workflows.
A workflow may require one or more of these files. Read its requirements before downloading a large model.
Put the Model in the Correct Folder
For classic checkpoint-based workflows, checkpoint files commonly belong in ComfyUI/models/checkpoints/. Other model architectures may use folders such as ComfyUI/models/diffusion_models/, ComfyUI/models/text_encoders/, and ComfyUI/models/vae/. LoRA files commonly go in ComfyUI/models/loras/.
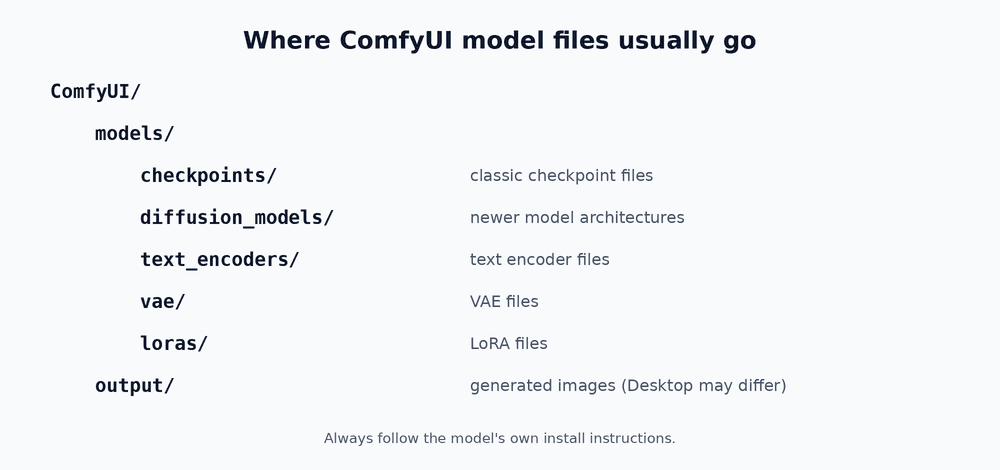
The required folders depend on the model and its loader nodes. Follow the model’s installation instructions rather than moving every file into checkpoints. After adding a model, refresh the relevant model selector or restart ComfyUI if it isn’t detected.
Download models from the official model page or a trusted repository, and check the license before using generated outputs commercially.
How to Generate Your First Image in ComfyUI
Once the installation and model are ready, test the workflow.
Load a Compatible Workflow
Open a basic text-to-image workflow designed for your chosen model. If the workflow is already available in ComfyUI, select it; otherwise, download a compatible workflow from a trusted source. Check that the model loader recognizes the model and that there are no missing-node warnings.
Enter a Prompt and Run the Workflow
Try a simple prompt, such as:
A small wooden cabin beside a lake at sunrise, soft golden light, realistic landscape photography.
Enter the prompt into the workflow’s text field. Keep sampler, steps, and resolution at the workflow defaults for your first image. Click Queue Prompt to start generation.
If the workflow completes successfully, your first image should appear in the interface or output preview. The default output location for many standard installations is the output directory inside the ComfyUI installation, though Desktop-managed installations may organize output folders differently. Save your working workflow so you can reuse it later.
A first test image is useful for confirming that the installation works, but real projects need a clearer purpose. If you plan to create visuals for social media, ads, or client campaigns, our guide explains how to use AI-generated images in marketing with a more practical workflow.
Common ComfyUI Installation Problems on Windows and How to Fix Them
Read the error first. Reinstalling rarely fixes a missing model, wrong launch file, or GPU-driver issue.
| Problem | What to check first |
|---|---|
| ComfyUI won’t start | Read the terminal or application logs |
| 127.0.0.1:8188 won’t load | Confirm the server started and the terminal is still open |
| Model doesn’t appear | Check the model folder, file name, and workflow compatibility |
| CUDA or GPU error | Check the selected package, driver, and supported hardware |
| Out-of-memory error | Reduce image dimensions or batch size, or use a suitable lighter model |
| Workflow has missing nodes | Identify the missing custom nodes and install only the necessary ones |
ComfyUI Won’t Start or the Window Closes
Start by reading the error message. It may identify a dependency problem, unsupported GPU configuration, or driver issue. Use the instructions for your installation type, and avoid copying commands from a tutorial written for a different version or GPU.
The Browser Cannot Open 127.0.0.1:8188
Check whether the application is still running. For Portable, the terminal window must remain open. If the server reports a different address or port, use the one shown in the terminal. If another process is using the port, consult the official troubleshooting documentation before changing settings.
The Checkpoint or Model Does Not Appear
Confirm that the file is in the correct directory and compatible with the loaded workflow. Refresh the relevant model selector or restart the instance if needed.
CUDA or GPU Memory Errors Appear
Check your graphics drivers and whether you selected the correct package. For memory errors, try a smaller image size or batch size before reinstalling the software.
For more involved problems, use the official ComfyUI documentation and the ComfyUI GitHub repository. Include the exact error message when looking for help.
How to Keep Your ComfyUI Installation Organized and Updated
Keep Models and Workflows Organized
Store compatible model files in their designated folders and keep copies of workflows you use regularly. If you have multiple installations, the official Portable documentation explains how to configure additional model paths to reuse model files.
Install Custom Nodes Only When Needed
Custom nodes can add useful features, but each one adds another dependency that may break after an update. Start with a basic workflow and install only the extensions required by the workflow you want to use.
Back Up Before Updating
Export your workflows and copy your model paths before a major update. Desktop and Portable have different update procedures, so follow the instructions for your specific installation.
For more guides on open-source software and practical AI setup, explore AiGetPro’s Free AI Tools & GitHub Guides.
Frequently Asked Questions
Is ComfyUI free?
Yes. ComfyUI’s core software is free and open source under GPL-3.0. However, AI models, cloud services, and some custom nodes may have separate license terms or costs.
Can I install ComfyUI on Windows 11?
Yes. ComfyUI Desktop supports Windows 10 and later, including Windows 11. Your hardware and chosen model determine which workflows will run comfortably.
Does ComfyUI require Python to be installed separately?
Not when you use Desktop or the packaged Portable version. Both manage or include the Python environment required by their respective installation method.
Can ComfyUI run without a GPU?
Yes, a CPU-only setup is possible, but image generation can be considerably slower. A compatible GPU is recommended for a smoother local experience.
How much disk space should I reserve for ComfyUI?
The Desktop documentation recommends at least 4.85 GB per installation. Reserve additional space for model downloads, custom nodes, workflows, and generated images.
Can I install ComfyUI on a drive other than C:?
Yes. Choose a writable location with sufficient space, such as D:\ComfyUI, and keep track of where your models and output folders are stored.
Can ComfyUI share models with other AI image-generation tools?
Often yes, where the model formats and configurations are compatible. ComfyUI also supports additional model paths, which can help avoid duplicate downloads.
Can I use ComfyUI offline?
Local workflows can run offline after the application, models, and dependencies have been downloaded. Model downloads, online features, and certain external services still require an internet connection.
Are ComfyUI custom nodes safe to install?
Custom nodes are third-party code and should be treated carefully. Prefer trusted sources, check compatibility, and avoid installing extensions you don’t need.
Should beginners use Desktop or Portable?
Beginners should usually start with ComfyUI Desktop. Portable is better once you want a self-contained folder, manual control, or a specific GPU package.
Why doesn’t my ComfyUI model show up?
Check that the file is in the correct model folder, compatible with the workflow, and recognized by the loader node. Refresh the model list or restart ComfyUI.
What is the ComfyUI local URL?
ComfyUI commonly runs at http://127.0.0.1:8188. If it uses a different address or port, use the one shown in the terminal or application.
Final Recommendation: Get ComfyUI Working Before Adding More Features
The easiest way to get started is to install ComfyUI Desktop, choose a compatible local setup, load a supported model, and generate one test image. You can move to Portable later if you need a self-contained folder or more control over your installation.
If something fails, check the actual error before changing dependencies or reinstalling the whole application. Once one basic image generates successfully, adding models and custom nodes becomes much easier.
When you’re comfortable with ComfyUI, the next useful step is learning where model files come from and how they connect to workflows. Our beginner guide explains how to use Hugging Face models with ComfyUI, including checkpoints, LoRAs, and compatible workflow setup.

Arsalan is an independent AI tools researcher and
digital publisher. He tests free and paid AI tools,
tracks the remote AI job market, and writes practical
guides for professionals who want to work smarter
with AI.
Now focused on
AiGetPro — a resource for honest AI tool comparisons,
remote AI job guides, and free GitHub tool discoveries.